Student Marks
Enter marks, approve and publish results, and print report cards.
This is the main place to work with results. You pick an exam, shift and class, get the list of students, and then for each student you can enter marks for every subject on one form, approve the result, publish it and open the report card.
A result moves through three states: no marks → marks entered → approved → published. Parents and students see only published results, and a result can only be published once it is approved.
Before you start
Find the students
Open Exam Section → Student Marks.

- 1Exam (required). Choosing it loads the shifts.
- 2Shift (required). Choosing it loads the classes.
- 3Class (required). Choosing it loads the sections.
- 4Section. See the warning below.
- 5Search by student name.
- 6Load refreshes the list.
- 7Reset reloads the page.
- 8View All Mark: opens the report cards of every student with marks, in a new tab, ready to print.
Pick a section, even if it says None
Teachers only see the shifts, classes and sections they are assigned to, and only the students in them.
The student list
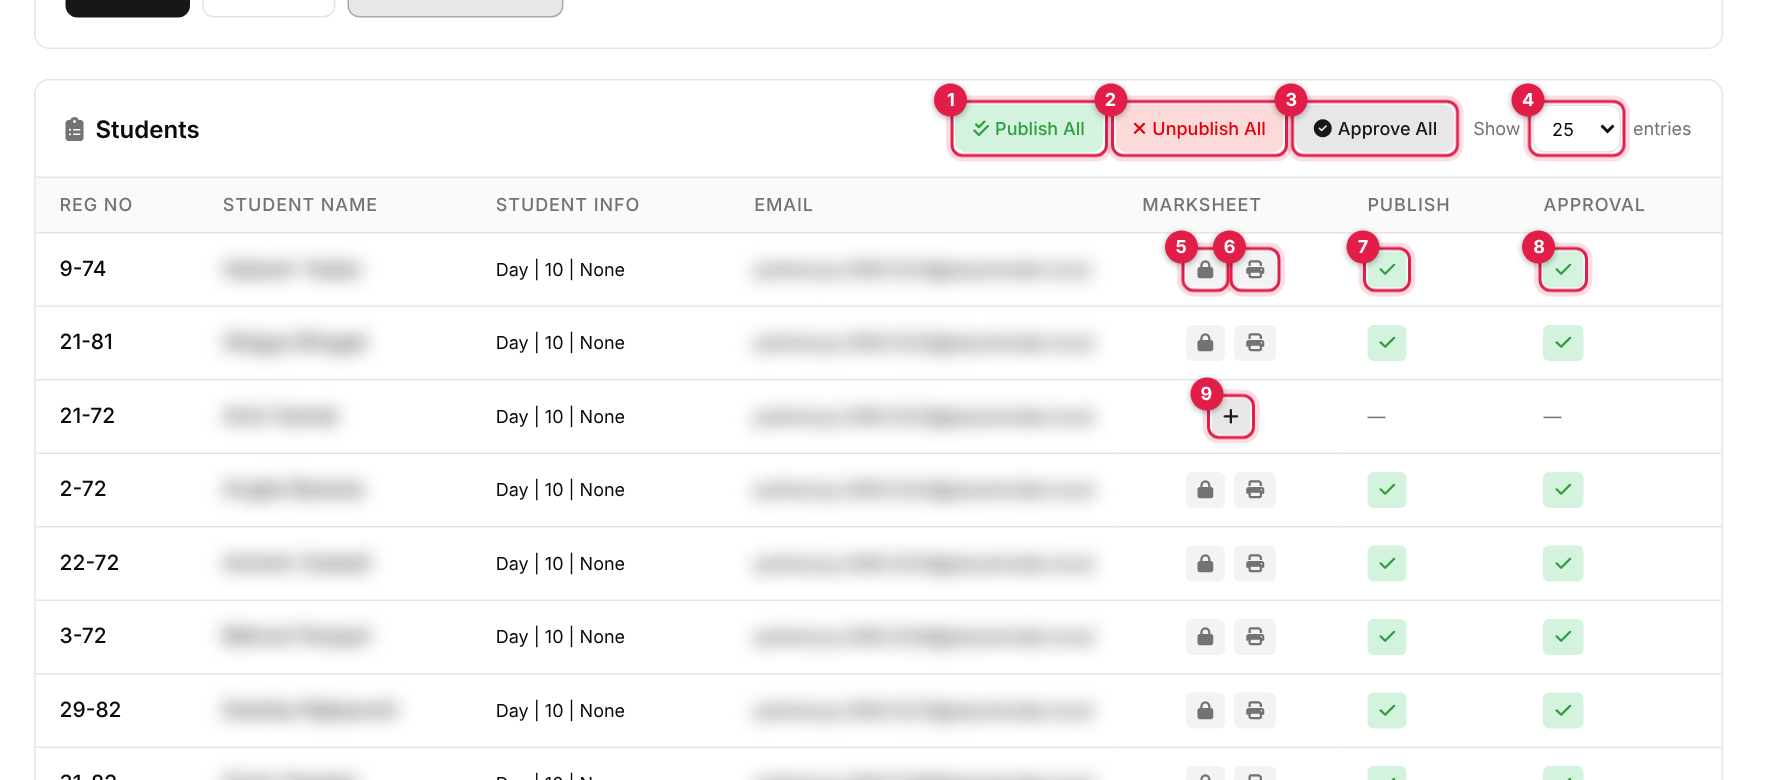
- 1Publish All: publishes every approved result in the list.
- 2Unpublish All.
- 3Approve All.
- 4Show 25, 50 or 100 entries.
- 5Lock in the Marksheet column: marks cannot be edited because the result is published (or approved, for non-super-admins). Clicking it says Please unpublish and unapprove the result before editing marks.
- 6View Marksheet (printer): opens the report card. Shown once marks exist.
- 7Publish toggle: green tick = published. Click to unpublish.
- 8Approval toggle: green tick = approved. Click to unapprove.
- 9+ (Add Marksheet): this student has no marks yet. It opens the entry form in a new tab.
The Publish and Approval columns show a dash (—) for a student with no marks, or if you do not have the permission. Only users with the publish or approve permission see the bulk buttons. Teachers do not get these by default.
Approve and publish
-
1
Approve
Click the Approval toggle for one student, or Approve All for everyone listed. Un-approving a result also unpublishes it. -
2
Publish
Click the Publish toggle, or Publish All. Only approved results are published. If you try to publish an unapproved one you are told Please approve the result before publishing., and with Publish All the others are published and the rest are skipped (N marks published, M skipped (not approved)). -
3
Correct a mistake later
Unpublish, then (for approved results) unapprove, fix the marks, and approve and publish again. There is no bulk un-approve.
Enter marks for a student
Click the + (callout 9). The form shows every subject of the class on one page.
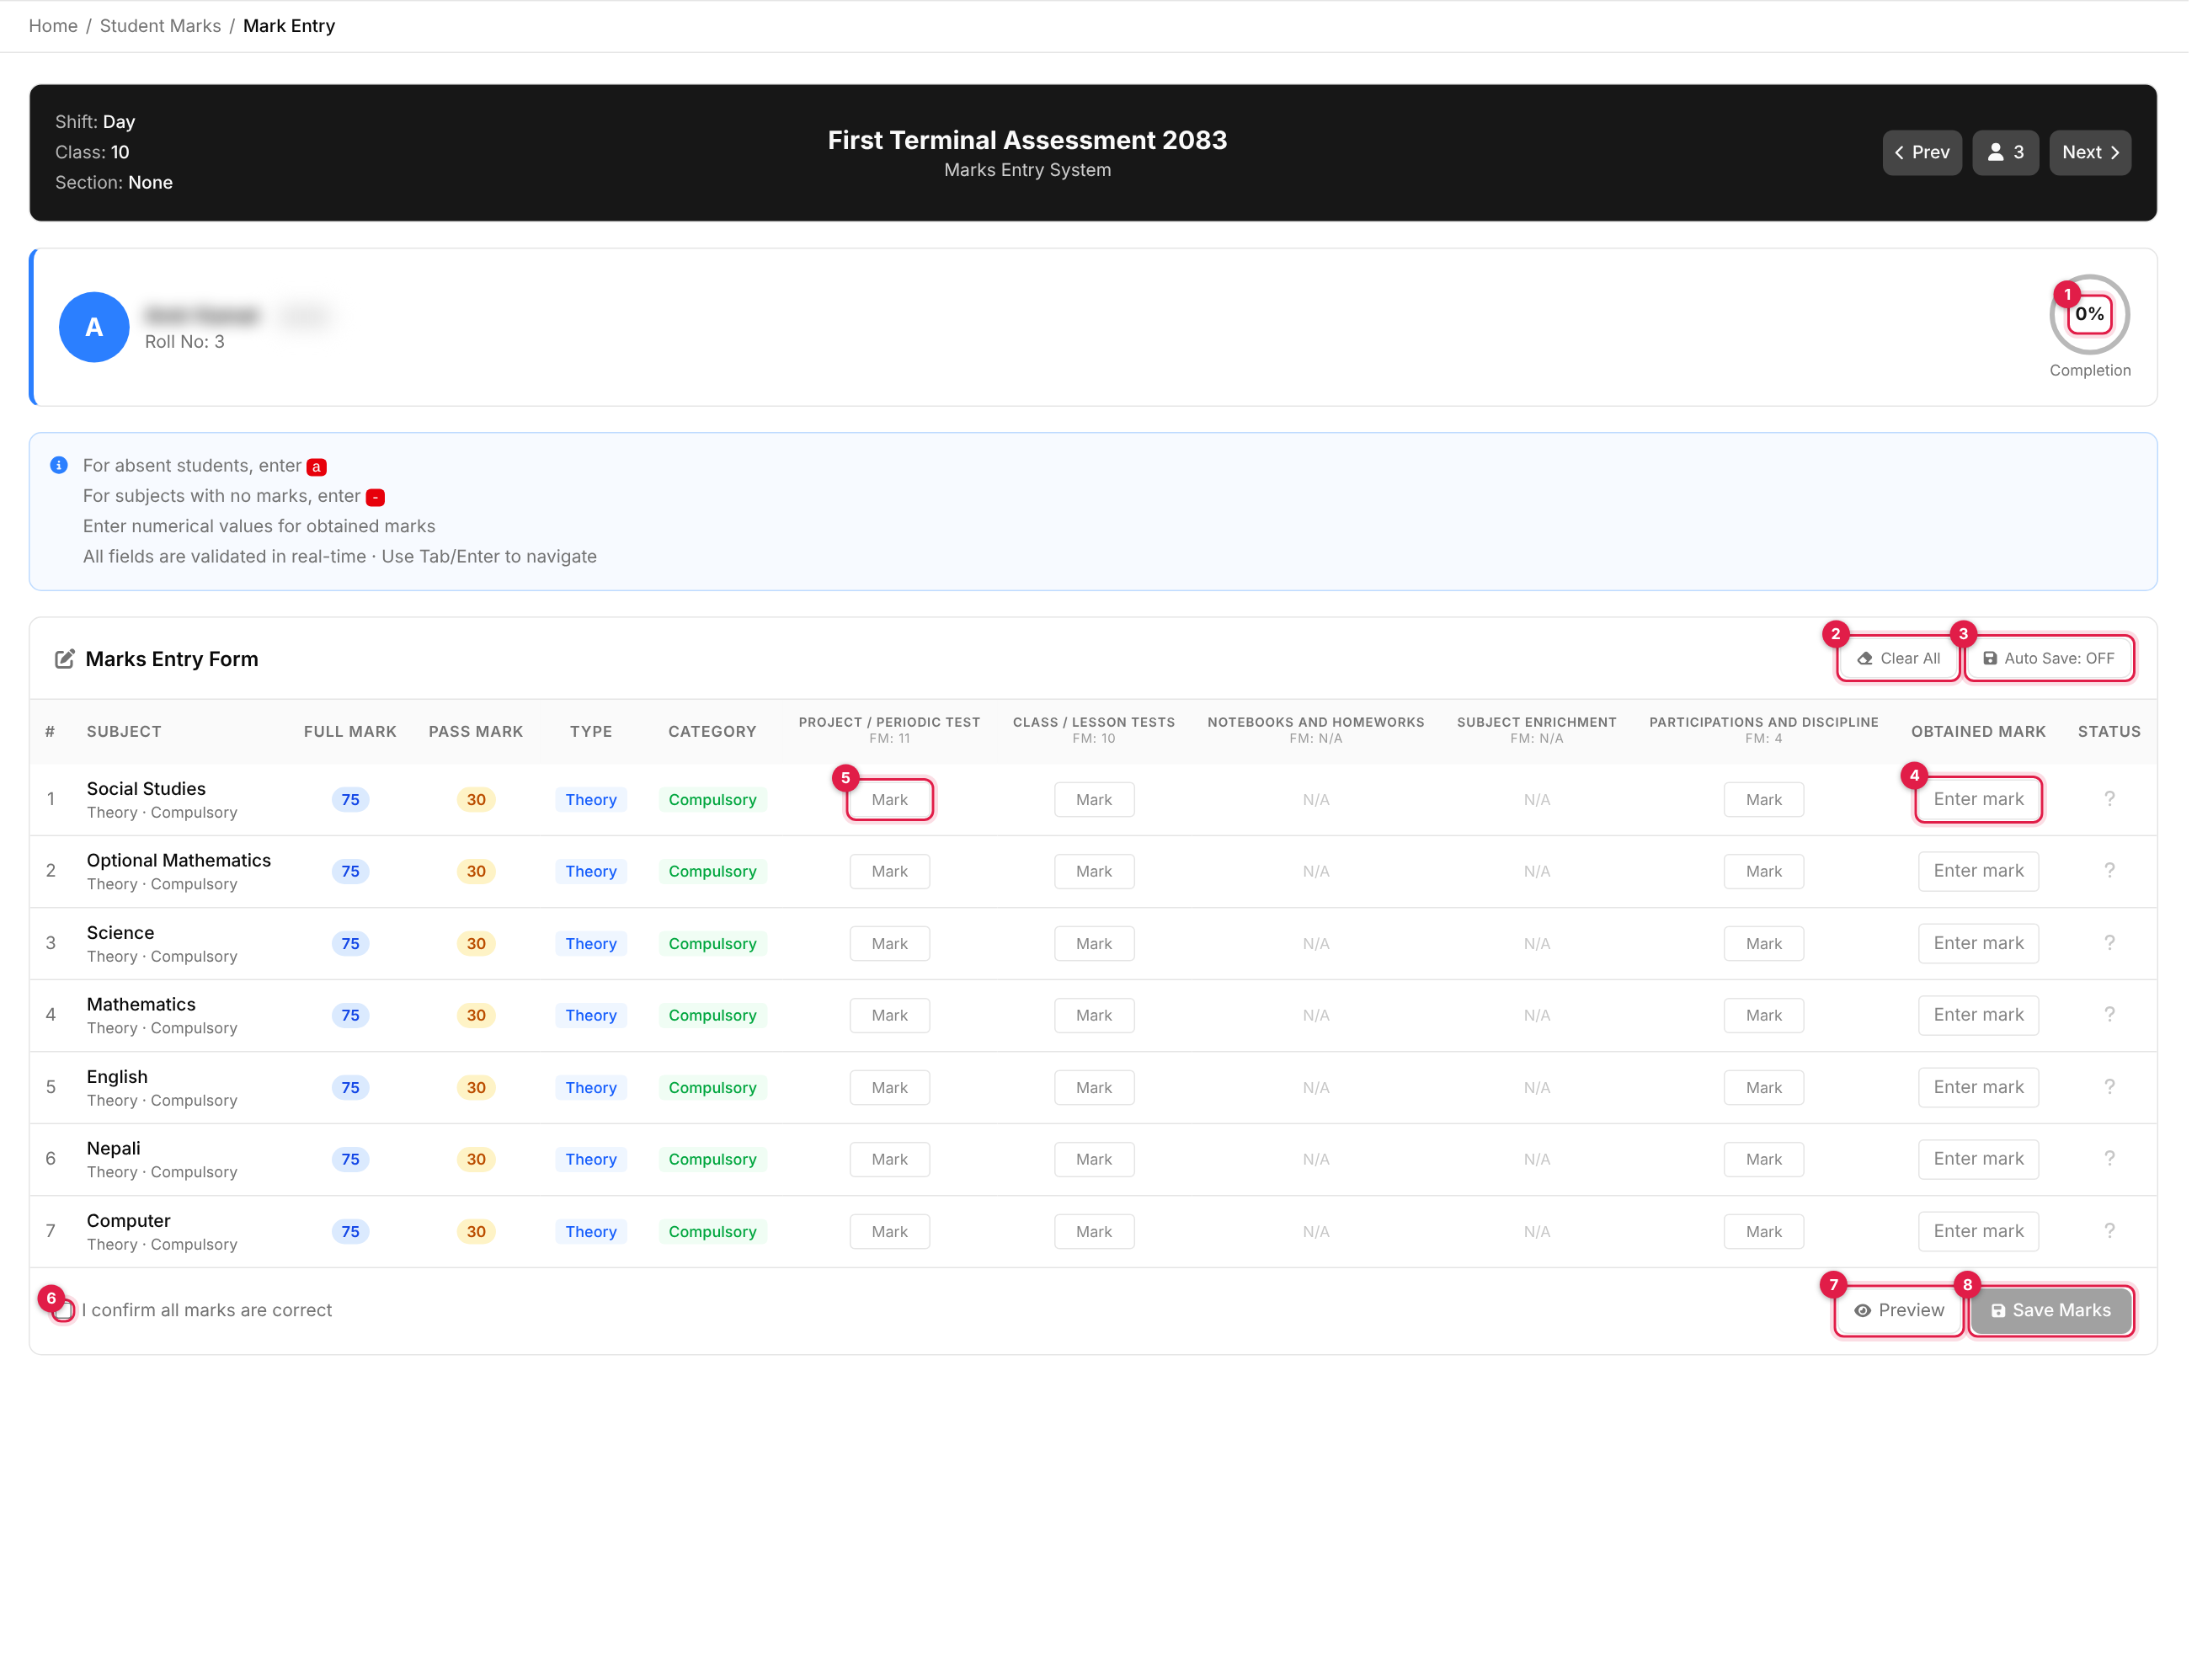
- 1Completion: the share of cells filled in. The black header also has Prev / Next buttons to move to the neighbouring student.
- 2Clear All: empties the form (you are asked to confirm).
- 3Auto Save: switch ON to save automatically 2 seconds after you stop typing.
- 4Obtained Mark: the subject's main (summative) mark.
- 5Formative columns: one per formative assessment. FM is the full mark; N/A means it does not apply to that subject.
- 6I confirm all marks are correct: tick this to enable saving.
- 7Preview: shows a summary before saving.
- 8Save Marks: enabled after you confirm, when the form is valid.
What you can type
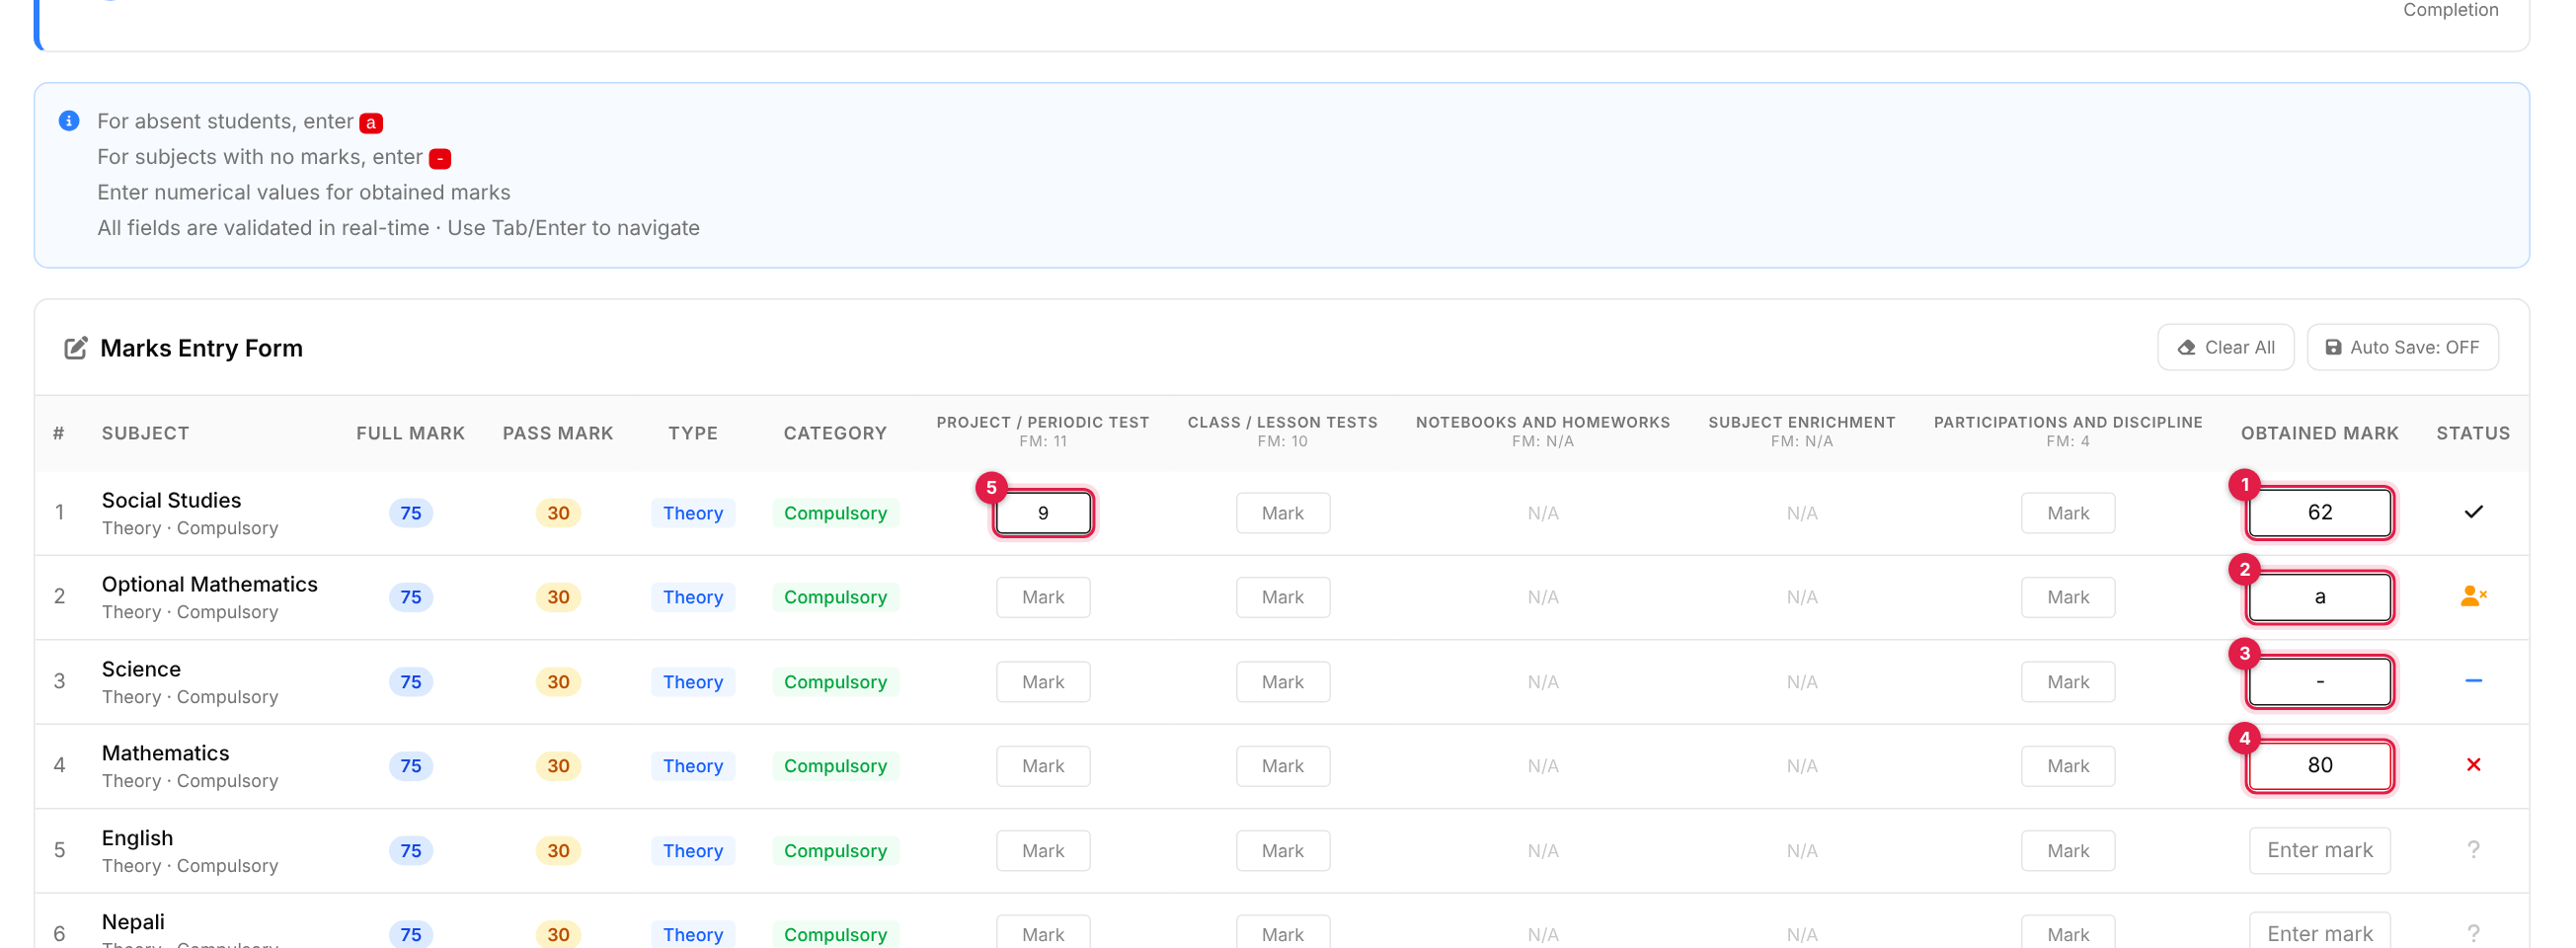
- 1A number, for example
62: valid (tick). Decimals are allowed. - 2
a: the student was absent (orange person icon). - 3
-: no mark for this subject (blue dash). - 4A number above the full mark, here
80for a 75-mark paper: red cross. The form cannot be saved until it is fixed. - 5A formative cell works the same way, against its own full mark.
-
1
Type the marks
Fill the cells. Use Tab or Enter to move on. Leave a cell blank if you do not want to enter it yet. -
2
Confirm
Tick I confirm all marks are correct. Optionally click Preview and then Confirm & Save. -
3
Save
Click Save Marks (or press Ctrl+S). The page reloads with the marks stored. Percentages, grades and grade points are worked out for you.
Good to know
- A blank cell is skipped, so you cannot erase a stored mark here. Use
-in the ledger to clear one. - With Auto Save ON there is no confirmation message. If you leave the page with unsaved typing you are asked You have unsaved changes. Leave?
- Teachers who teach only some subjects see only their own subject rows.
- Class teachers also get an Extra Marks form (Discipline, Remark, Regularity, Extracurricular, Attendance out of the exam's total attendance) that is printed on the report card.
When the form is closed
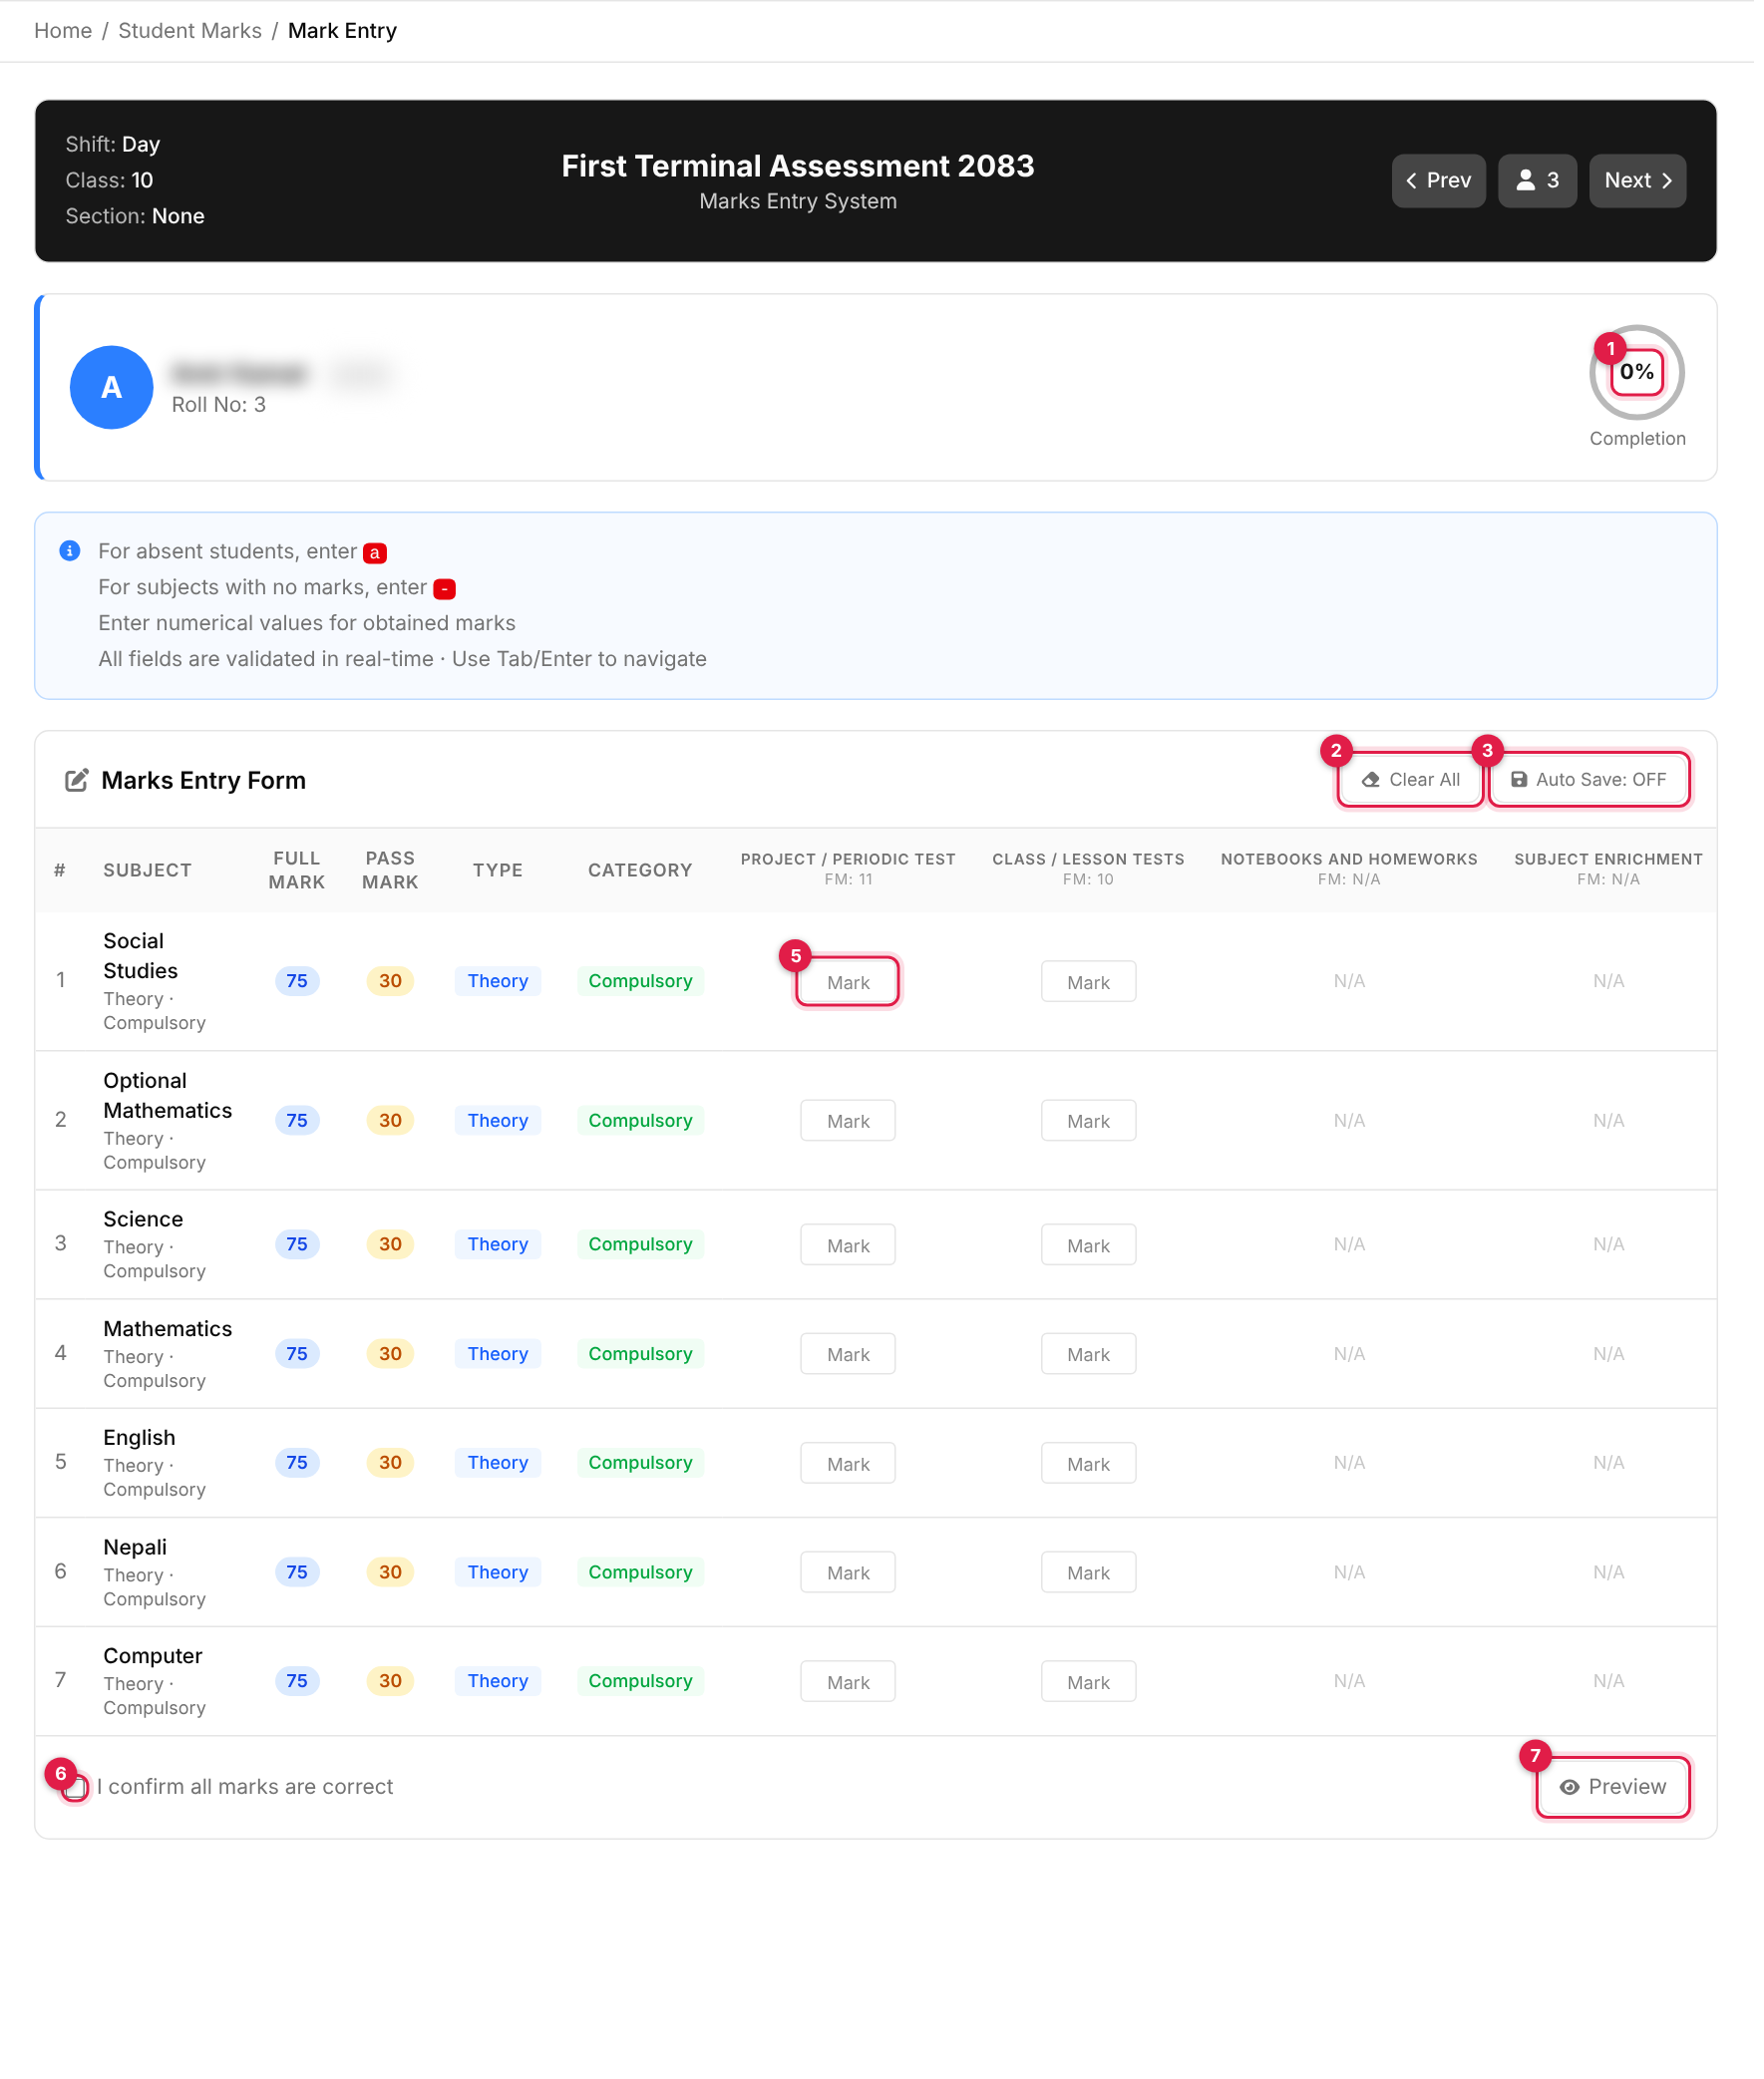
After the exam's Marks Deadline has passed, the cells become read-only and the Save Marks button disappears. To allow more entry, extend the deadline by editing the exam.
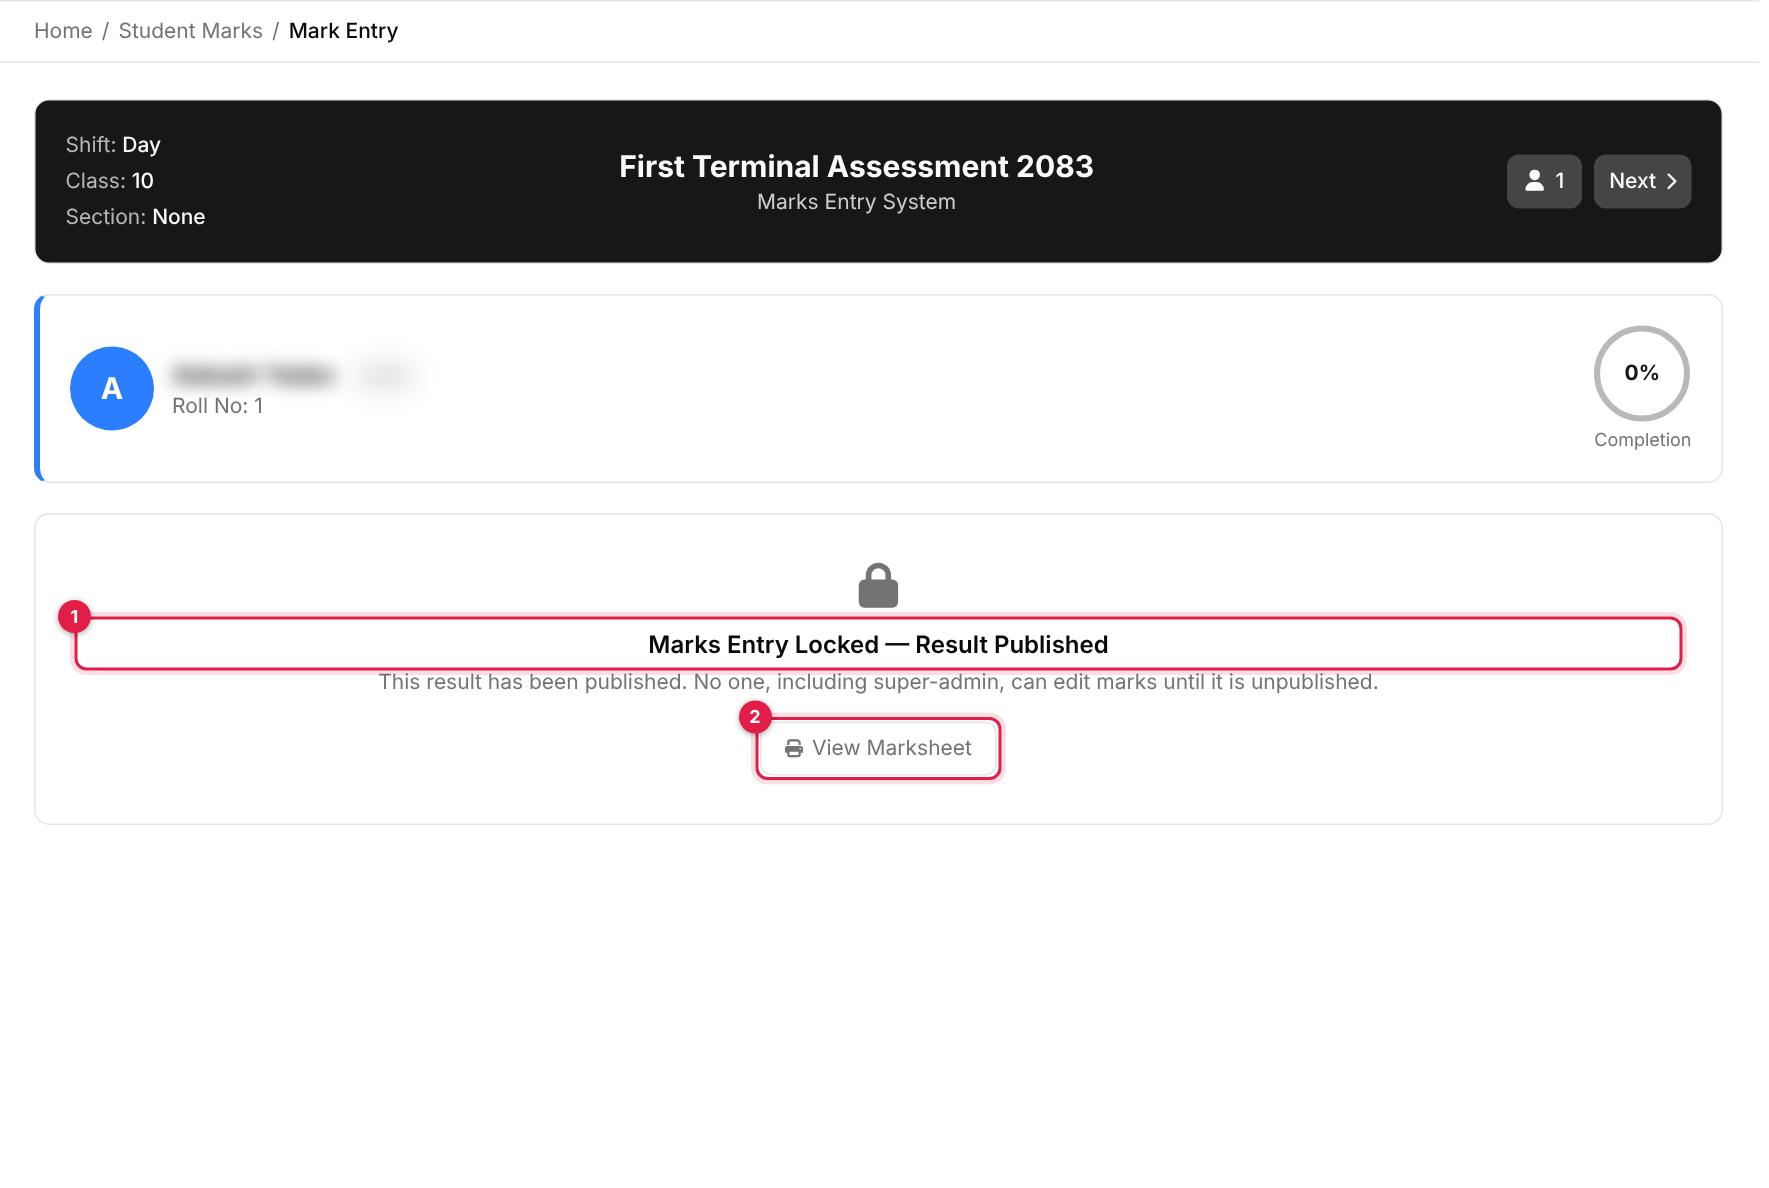
- 1Marks Entry Locked. For a published result no one, including a super-admin, can edit until it is unpublished. For an approved result the message says only a super-admin can edit.
- 2View Marksheet: open the report card.
The report card
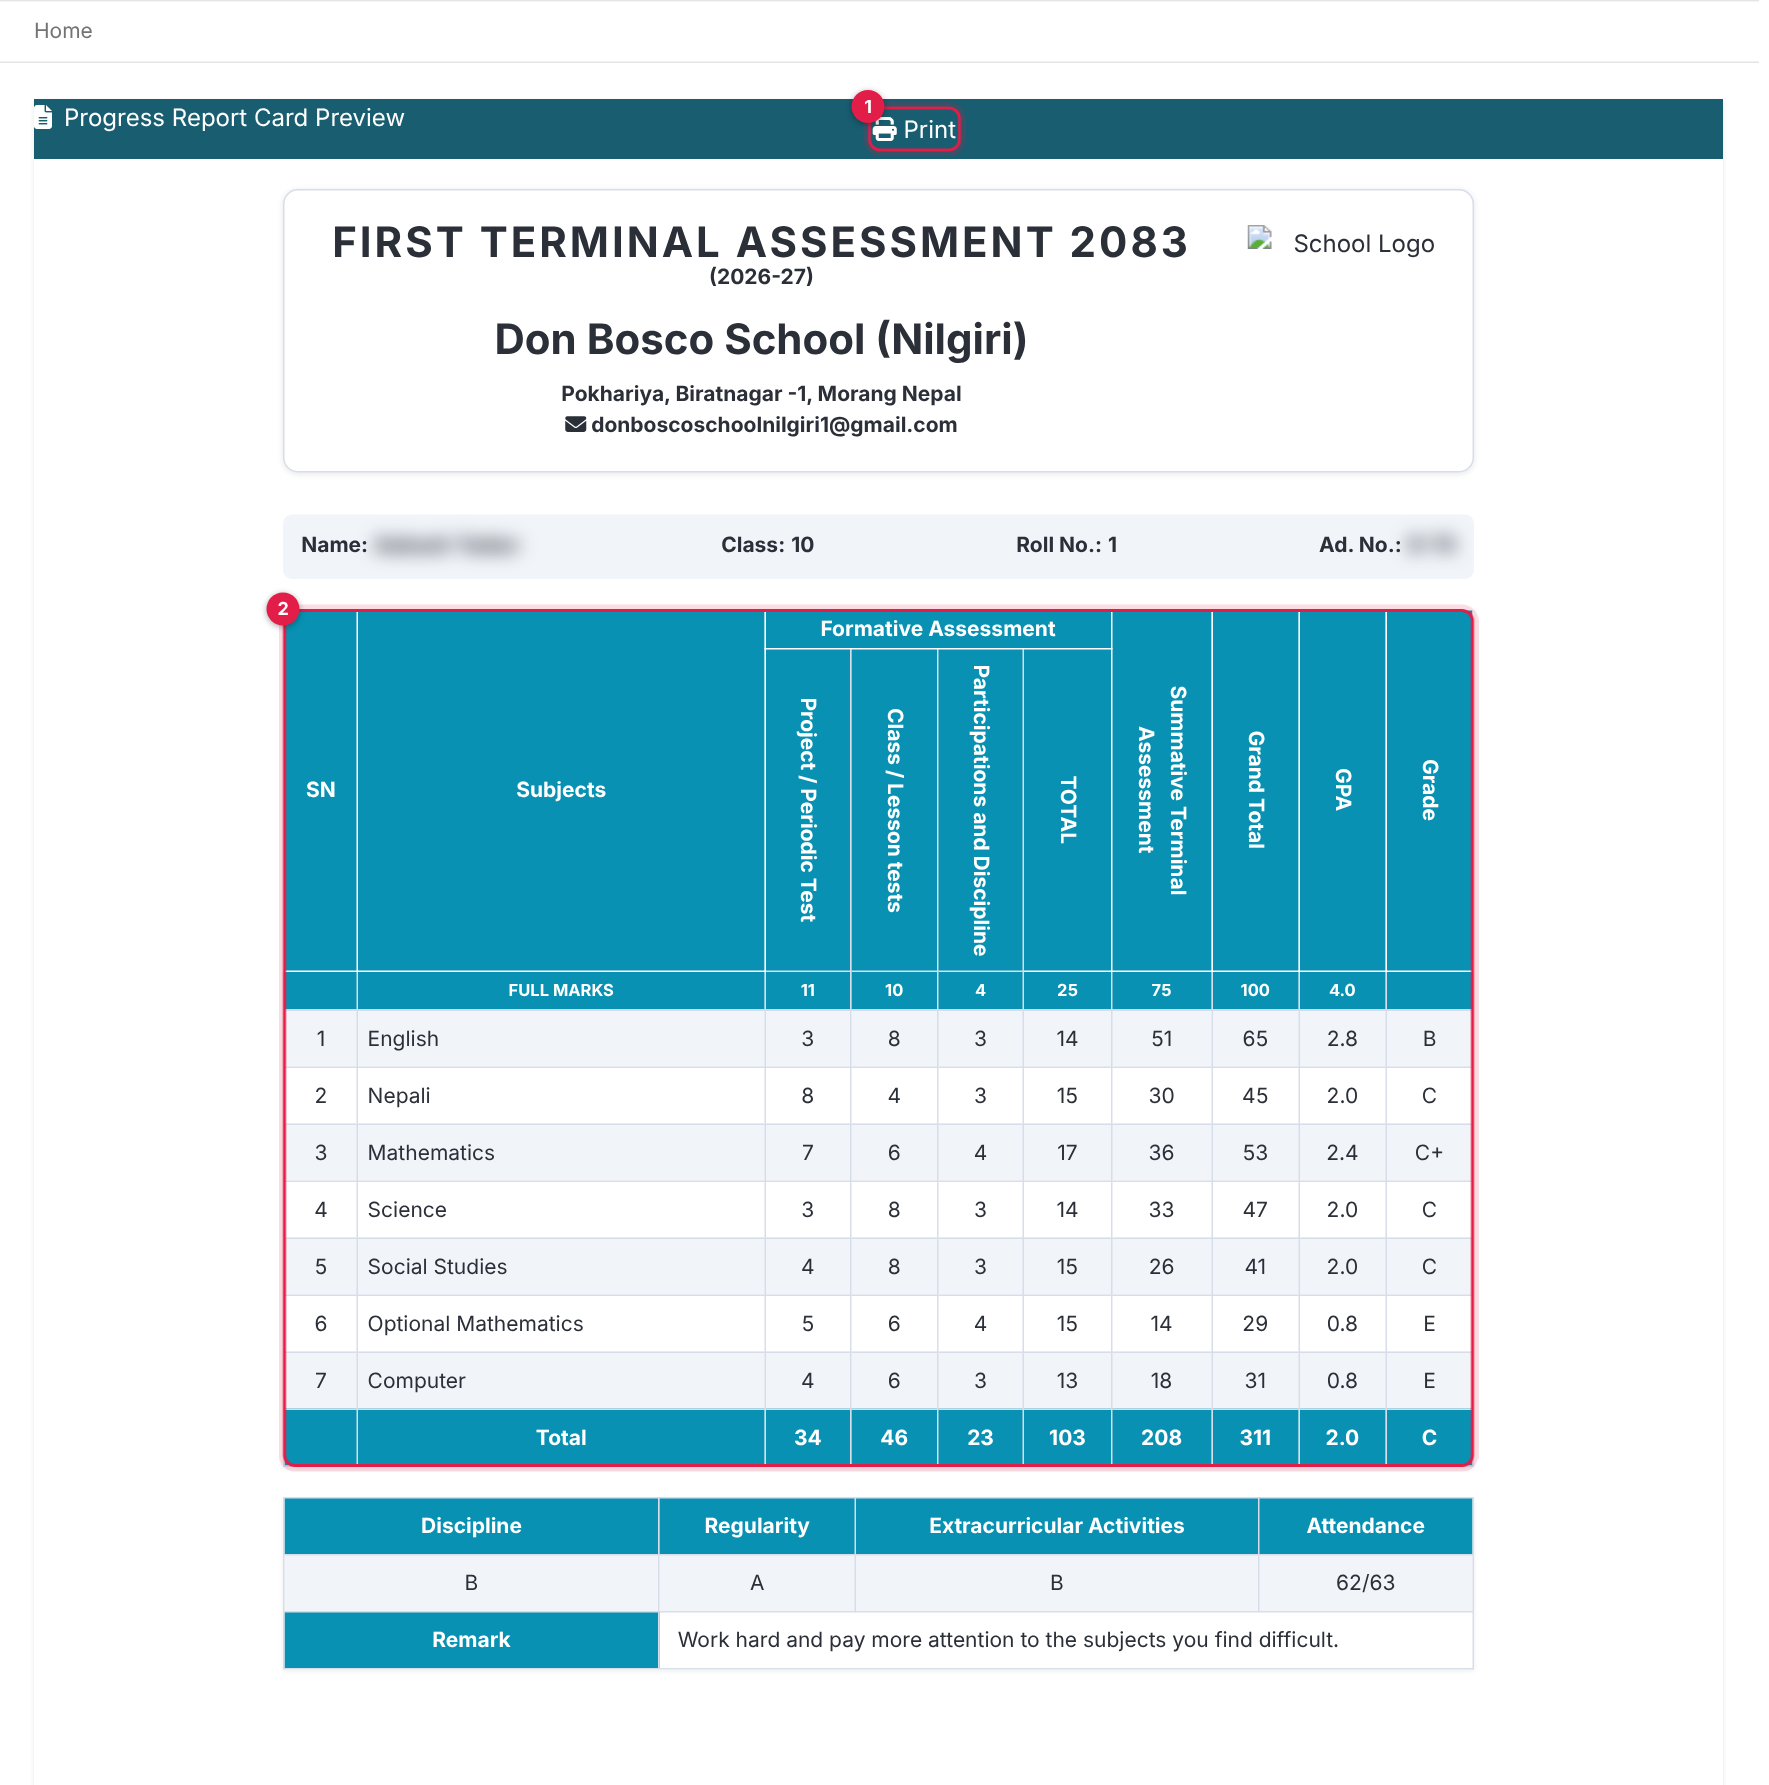
- 1Print: prints the card in a pop-up window.
- 2The marks table: each subject with its formative marks, their total, the summative (terminal) mark, grand total, GPA and grade. A FULL MARKS row sits on top and a Total row at the bottom.
Below the table are Discipline, Regularity, Extracurricular Activities, Attendance and a Remark. Absent shows as A and no mark as a dash. The colours, labels, logo and signature lines come from the exam result theme, which a super-admin sets in Settings (Customize Exam). The report card has no rank.
Messages you may see
| Message | What it means |
|---|---|
| Marks Entry Locked — Result Published / Approved | The result is locked. Unpublish (and unapprove) it first. |
| Marks entry deadline has passed. Contact admin to extend the deadline. | The exam's Marks Deadline is in the past. |
| Please approve the result before publishing. | Approve the student first. |
| Mark is Approved! / Mark is not Approved! | The approval was switched. |
| N marks published, M skipped (not approved) | Publish All skipped results that were not approved. |
| No students with marks found. | Bulk buttons need at least one student with marks. |
| Please select an exam first. | View All Mark needs an exam. |