Shift
School sessions with a start and end time, such as Morning or Day.
A shift is a session of the school day with a start time, an end time and a type: Regular Class or Exam. Regular shifts are attached to classes; exam shifts are used for exam scheduling.
Where it is used
- Linking classes to shifts (Class → Manage Shift)
- Sections, student enrolment and attendance
- Routines, exams and fees
The list page
Open Main Entry → Shift from the sidebar, or click the Shift card on the Main Entry dashboard.
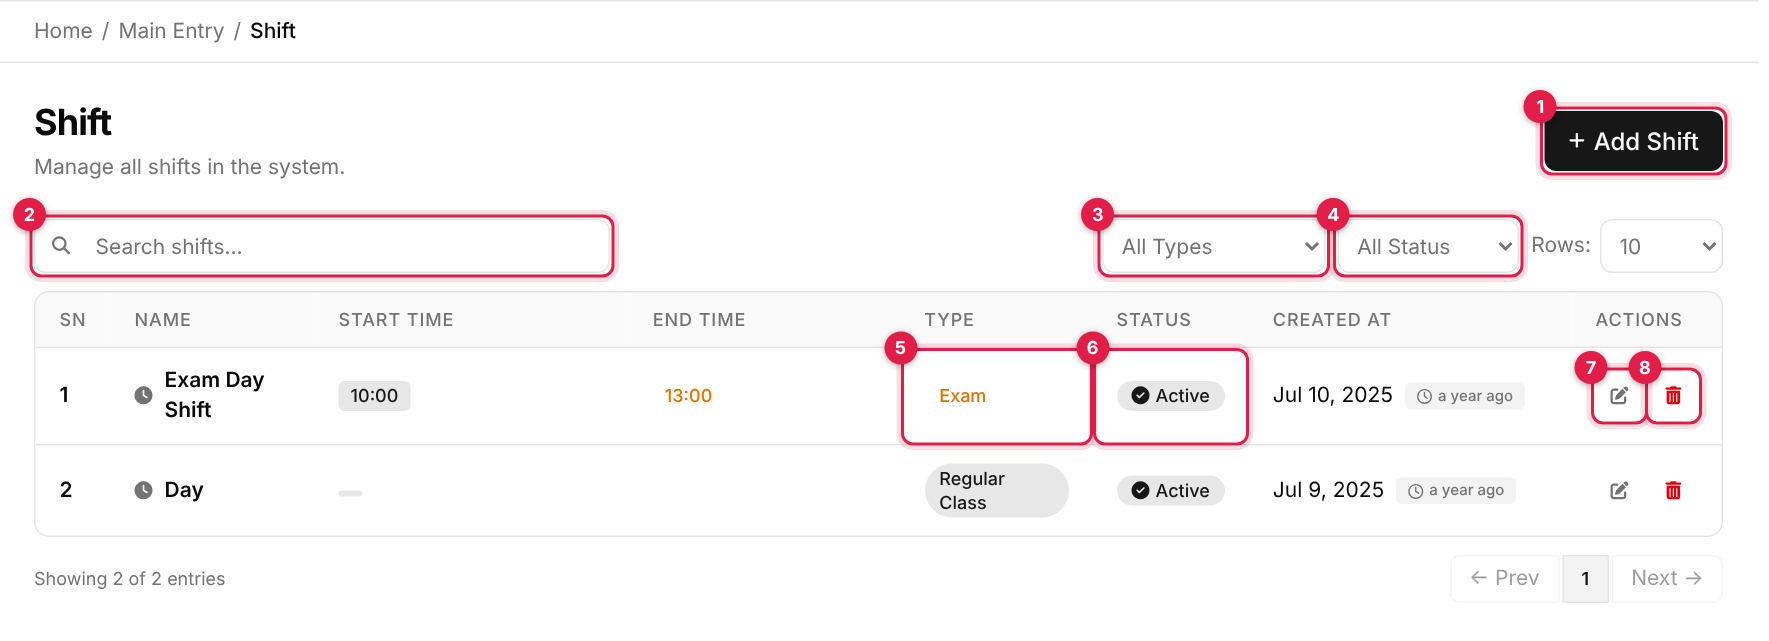
- 1Add Shift opens the form.
- 2Search filters the list by shift name as you type.
- 3All Types filter: Regular Class or Exam.
- 4All Status filter: Active or Inactive.
- 5Type of the shift (Regular Class or Exam).
- 6Status: Active or Inactive.
- 7Edit (pencil).
- 8Delete (red bin).
| Column | Shows |
|---|---|
| SN | Row number on the current page. |
| Name | Shift name. |
| Start Time / End Time | When the shift begins and ends. |
| Type | Regular Class or Exam. |
| Status | Active or Inactive. |
| Created At | The date it was added. |
| Actions | Edit and delete. |
Add a shift
-
1
Open the form
Click Add Shift (callout 1 above). A panel slides in from the right. -
2
Fill in the details
Complete the fields below. The numbers match the callouts in the screenshot.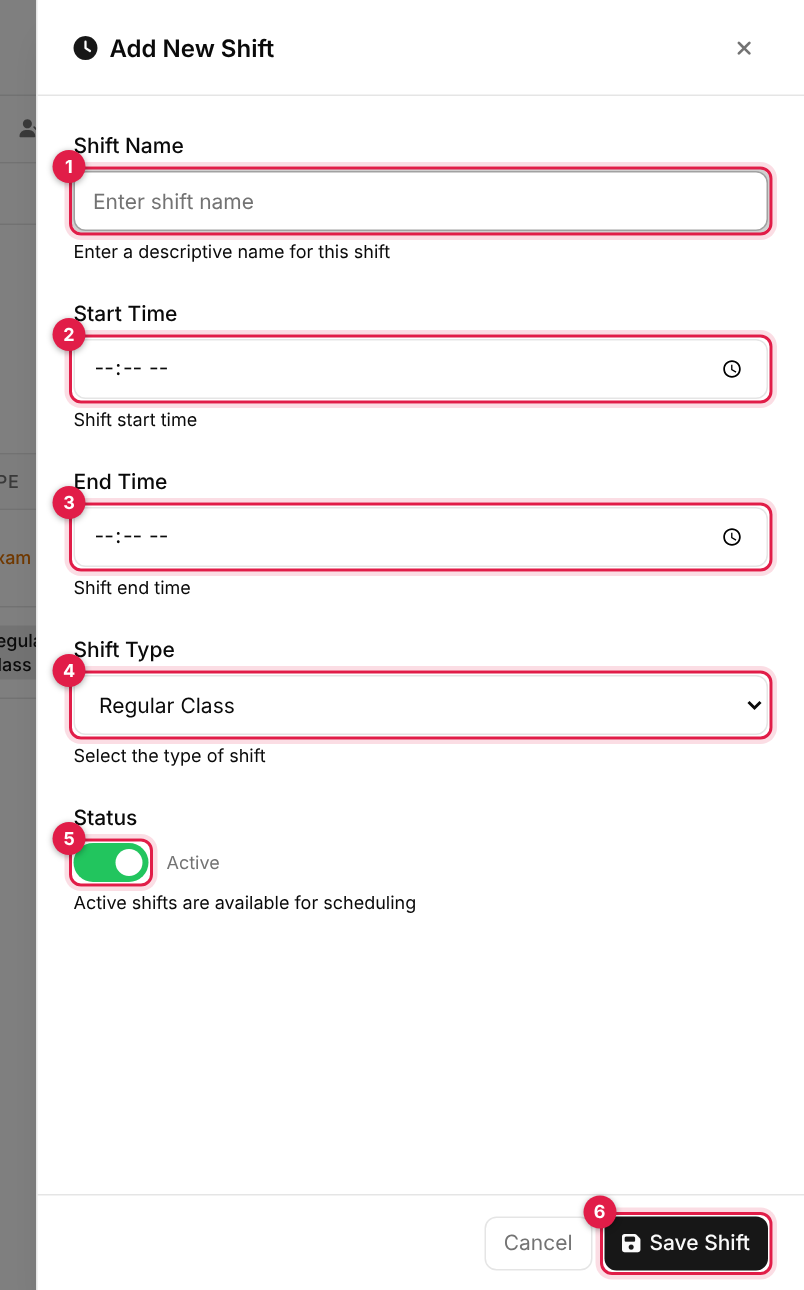
The add form for shift # Field Required What to enter 1 Shift Name Yes A descriptive name, for example Morning.2 Start Time Yes When the shift starts. 3 End Time Yes When the shift ends. The system does not check that this is later than the start time, so double-check it. 4 Shift Type Yes Regular Class (default) for normal teaching, or Exam for exam sessions. 5 Status No On (default) = available for scheduling. -
3
Save
Click Save Shift (the last callout). On success the panel closes, the list refreshes and a green Success message appears. If something is wrong, a red Error message lists the problems and the panel stays open so you can fix them. Cancel, the × or a click outside the panel closes it without saving.
Edit shift
-
1
Open the record
Find the row and click the pencil icon in the Actions column (callout 3). -
2
Change and update
The panel opens as Edit Shift with the current values filled in. Change what you need and click Update Shift.
Deactivating instead of deleting
To retire a shift without losing history, edit it and switch Status off. It stays in the list as Inactive and drops out of the dropdowns that use it.
Delete shift
-
1
Click the bin
Click the red bin icon in the Actions column (callout 4). -
2
Confirm
Your browser asks you to confirm. Click OK to delete or Cancel to keep it.
Deleting is permanent
Deleted records cannot be restored. If it has already been used elsewhere in the system the delete may be refused with An error occurred. Please try again. Mark it Inactive instead.
Good to know
Create shifts before classes use them
Only Active shifts of type Regular Class appear when you assign a shift to a class. Exam shifts do not appear there.
Inactive shifts disappear from dropdowns
An inactive shift is no longer offered when assigning sections, but existing records keep their link to it.
Messages you may see
| Message | What it means |
|---|---|
| <name> shift created successfully! | The record was added. |
| <name> shift updated successfully! | Your changes were saved. |
| Data deleted successfully! | The record was removed. |
| Data could not be deleted! | The delete was refused. |
| The slug has already been taken. | A record with the same name already exists. Names are compared ignoring capitals, spaces and punctuation, so Grade 1, grade 1 and Grade-1 count as the same. |
| An error occurred. Please try again. | The save or delete was refused, for example because the record is still in use elsewhere. |